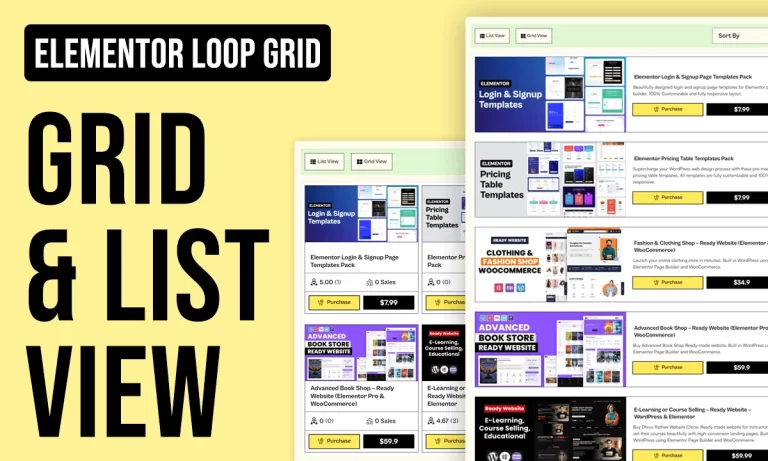
Overview: Grid and List View Toggle in Elementor
BUT: Elementor Loop grid currently lacks this feature, so we are going to do it ourselves.
This article provides a step-by-step guide on how to add a grid and list view toggle in Elementor’s Loop Grid, allowing users to switch between different display styles. It also covers how to use localStorage to save the user’s selected view, ensuring the preferred layout is retained even after the page refreshes, enhancing user experience.
To toggle between list view and grid view for a listing grid created with Elementor Loop Grid, you can achieve this using a combination of CSS, JavaScript (jQuery), and Elementor’s custom classes. Here’s a step-by-step guide:
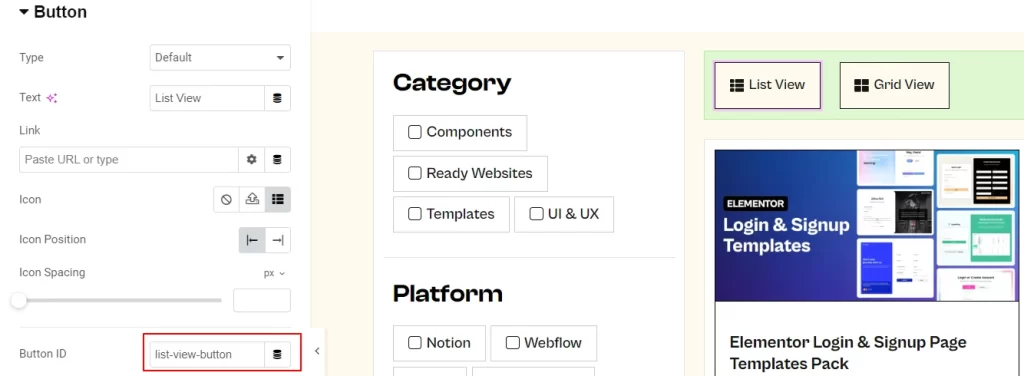
1. Add Toggle Buttons
First, add two buttons (or icons) using Elementor. These buttons will serve as your controls for switching between grid and list views.
- Button 1: List View
- Button 2: Grid View

And set a unique ID to each button: grid-view-button and list-view-button
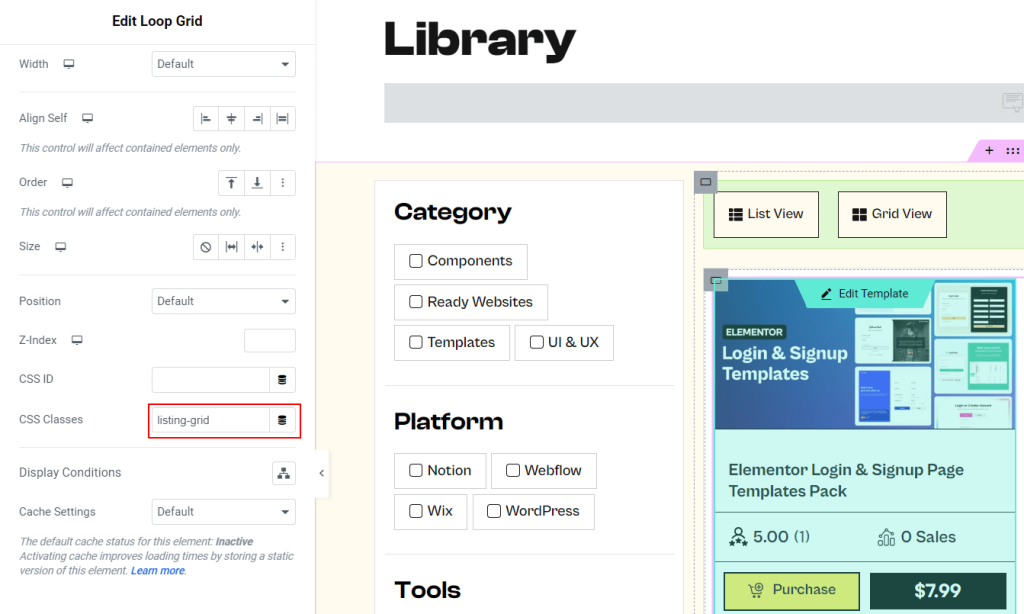
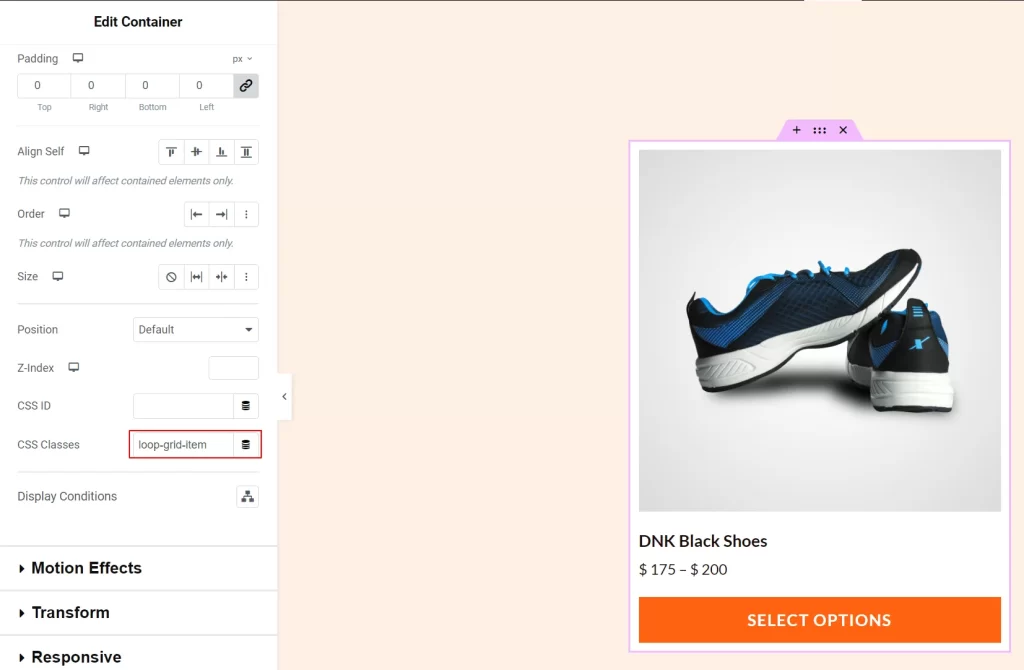
2. Assign Classes to Your Loop Grid & Loop Item
In your Elementor Loop Grid widget, go to the Advanced tab and add a custom class like listing-grid
Now edit your Loop Item template and assign the loop-grid-item class to the loop item’s main container.
3. Add Custom CSS
Go to Elementor > Custom CSS (if using Elementor Pro) or use the customizer/child theme and add the following CSS:
					/* Default grid style */
.listing-grid .elementor-grid {
    display: grid;
    grid-template-columns: repeat(3, 1fr); /* Adjust for the number of columns */
    gap: 20px; /* Optional spacing between grid items */
}

/* List view style */
.listing-grid.list-view .elementor-grid {
    grid-template-columns: 100%; /* Full width for list view */
    gap: 20px; /* Optional, keep the gap for spacing in list view */
}
.listing-grid.list-view .loop-grid-item {
	flex-direction: row;
}
.listing-grid.list-view .loop-grid-item > div:first-child {
	width: 40%;
}
.listing-grid.list-view .loop-grid-item > div:last-child {
	width: 60%;
}
4. Add Custom JavaScript (jQuery)
Use HTML widget anywhere on the page and add the following jQuery code to switch between grid and list views:
					jQuery(document).ready(function($) {
    // Check localStorage for user's last view
    var selectedView = localStorage.getItem('selectedView');

    if (selectedView) {
        $('.listing-grid').addClass(selectedView);
    }

    // On grid view button click
    $('#grid-view-button').on('click', function() {
        $('.listing-grid').removeClass('list-view');
        localStorage.setItem('selectedView', ''); // Save grid view state
    });

    // On list view button click
    $('#list-view-button').on('click', function() {
        $('.listing-grid').addClass('list-view');
        localStorage.setItem('selectedView', 'list-view'); // Save list view state
    });
});
Don’t forget to wrap the code in a <script> tag.
Replace #grid-view-button and #list-view-button with the respective ID or class of the buttons you added in Elementor.
5. Save & Test
Preview your page, and clicking the buttons should now toggle between the grid and list views. This approach lets users switch between views without page reloads, offering a smoother user experience.
6. Add Clear Button (Optional)
You can add an optional button to reset the user’s view preference by clearing the stored value
					$('#clear-view-button').on('click', function() {
    localStorage.removeItem('selectedView');
    location.reload(); // Refresh the page after clearing
});
7. Add Sorting Filter (Optional)
To add this shortcode you need to edit the functions.php file or you can use a plugin like WPCode. After adding the code use this shortcode on archive template [woocommerce_sorting]
					// Add WooCommerce sorting dropdown with a shortcode
function wp_custom_woocommerce_sorting_dropdown() {
    if (class_exists('WooCommerce')) {
        ob_start();
        woocommerce_catalog_ordering();
        return ob_get_clean();
    }
}
add_shortcode('woocommerce_sorting', 'wp_custom_woocommerce_sorting_dropdown');
8. Archive Info (Optional)
To add this shortcode you need to edit the functions.php file or you can use a plugin like WPCode. After adding the code use this shortcode on archive template [product_archive_info]
					function wpacademy_woocommerce_product_archive_info() {
    if ( !is_shop() && !is_product_category() && !is_product_tag() ) {
        return;
    }

    global $wp_query;

    $total_products = $wp_query->found_posts;
    $products_per_page = wc_get_default_products_per_row() * wc_get_loop_prop( 'columns' );
    $current_page = max(1, get_query_var('paged'));
    $first_product = ( $current_page - 1 ) * $products_per_page + 1;
    $last_product = min( $current_page * $products_per_page, $total_products );

    return sprintf(
        'Displaying products %d–%d of %d.',
        $first_product,
        $last_product,
        $total_products
    );
}

add_shortcode('product_archive_info', 'wpacademy_woocommerce_product_archive_info');